10. Company Management
Configure your company profile, manage team members, and control permissions.
10.0 Account, Companies and Facilities
Stone Project has three levels. Knowing which one you are looking at answers most "where did my data go?" questions.
| Level | What it is | What lives there |
|---|---|---|
| Your account | Your login — one email address. It can belong to more than one company. | Only what is personal: your name, language, password and notification preferences. These follow you everywhere. |
| Company | The business itself. Everything you work with belongs to one company. | Pieces, clients, projects, quotes, invoices, price lists, team, company settings and the subscription. Nothing is shared between two companies. |
| Facility (Pro) | A physical location inside the same company — warehouse, showroom, shop, office. | Same company, same data. A facility records where material and crews are, and lets you filter what you see. It is not a separate business. |
Belonging to more than one company
Your account can belong to more than one company in two ways:
- Someone invites you to their team (see Team Members & Roles). You keep your own company and gain access to theirs.
- You create another company yourself: Settings → Create new company (also under Settings → Switch Company). Use this only for a separate legal entity with its own clients, team and invoices. Two yards of the same business are facilities, not a second company.
When you belong to more than one, the company name at the top of the Dashboard turns into a menu:
- Tap the company name — an arrow appears next to it when switching is available.
- Pick the company you want to work in.
Everything reloads for that company: inventory, clients, calendar, quotes, invoices, team and plan. Your role is the one that company gave you, so the same login can be Owner in one company and Sales in another.
Each company carries its own subscription. Upgrading one does not upgrade the other, and each is billed separately. The 7-day Pro trial is granted once, on the first company you own. Additional companies you create start on the Free plan — subscribe in Settings → Subscription if that company needs Pro.
Facilities are not separate companies
Every company starts with one main facility, created from your company address. Adding more (see Facilities) does not split the business:
- Clients, price lists, team, quotes and billing stay company-wide.
- Pieces, projects and scheduled activities can be tagged with a facility, so you know where the material and the crew are.
- Team members can be limited to the facilities they work at — they will not see the other yards' inventory.
Once a company has two or more facilities, an Active Facility selector appears in the sidebar:
- Pick a facility and the lists (pieces, projects, quotes) show that location only.
- Pick All facilities to see everything you have access to.
- Records created before you added facilities have no location and stay visible either way.
Which one do I need?
Same business with two yards, one team and one bill → facilities. A separate legal entity with its own clients, team and invoices → a separate company.
10.1 Company Profile
Your company profile is your public presence on the marketplace. Other fabricators and potential buyers see this information when viewing your listings.
Access: Go to Settings > Company Profile.
Profile Fields
| Field | Description | Visibility |
|---|---|---|
| Company Name | Legal business name | Public |
| Trade Name | Display name on the marketplace | Public |
| Logo | Company logo image | Public |
| Phone | Business phone number | Public |
| WhatsApp number for quick contact | Public | |
| Business email | Public | |
| Website | Company website URL | Public |
| Description | About your business, specialties, services | Public |
| Address | Physical business address | Public (city/state) |
| Business Hours | Operating hours per day of the week | Public |
| Tax ID | Your country's tax number (see below) | On quotes/invoices |
Tax number on quotes and invoices
The tax number field is named after your country: CNPJ (Brazil), RFC (Mexico), NIPC (Portugal), P.IVA (Italy), NIF (Spain), ABN (Australia), GST No. (New Zealand), GST/HST No. (Canada, plus QST No. for Québec), VAT No. (UK, Ireland and the EU), CUIT (Argentina), NIT (Colombia), RUT (Chile), RUC (Peru, Panama) and RNC (Dominican Republic). Elsewhere it is simply Tax ID. The country comes from your company address, so set the country first.
When filled, the number prints under your address on every quote, invoice and payment receipt. Numbers with a check digit (CNPJ, CPF, ABN, NIF, P.IVA, CUIT, RUT...) are checked when you save, so a typo is caught before it reaches a customer. Leave it empty and your PDFs stay exactly as before.
Your customers have the same field (CPF/CNPJ in Brazil, RFC in Mexico...) on the client and the account form; it prints in the Bill To block. In Australia and New Zealand invoices are titled TAX INVOICE, as the law requires.
Verification Badge
Verified companies receive a badge on their profile, increasing trust with buyers. Verification may require:
- Valid business registration
- Phone number verification
- Email verification
10.2 Team Members & Roles (Pro)
Add team members to collaborate on your Stone Project account:
- Open Team (side menu) and tap Invite Member.
- Choose how the person gets in:
- Invite by Email: they receive an invitation and join once they accept it (works for someone who already has a Stone Project login, too).
- Create New User: you create the account and set the password right now; hand it to them.
- Fill Name, Email and Phone (used for internal contact and SMS notifications).
- Pick a Role. The role sets the default permissions, which you can still adjust below it:
| Role | Default access |
|---|---|
| Owner | Full access to all company features |
| Admin | Can manage team, company settings and all features |
| Member | Can manage inventory and basic features |
| Fabricator | Focused on production and inventory management |
| Sales | Focused on clients, quotes and orders |
| Finance | Full access to invoices, payments and financial reports |
| Facility Manager | Admin-level access restricted to their assigned facility |
| Accountant | Read-only access to accounting reports, for the outside accountant |
- Optional, under Work Assignment: Department, Facilities access (none selected = all facilities), Clock Reviewer and the time clock rules (photo, reason for off-schedule actions).
- Tap Invite (or Create User Account).
Time clock only members can only clock in and out; they do not use a plan seat. Use Add time clock only member when the plan has no seats left.
Managing Team Members
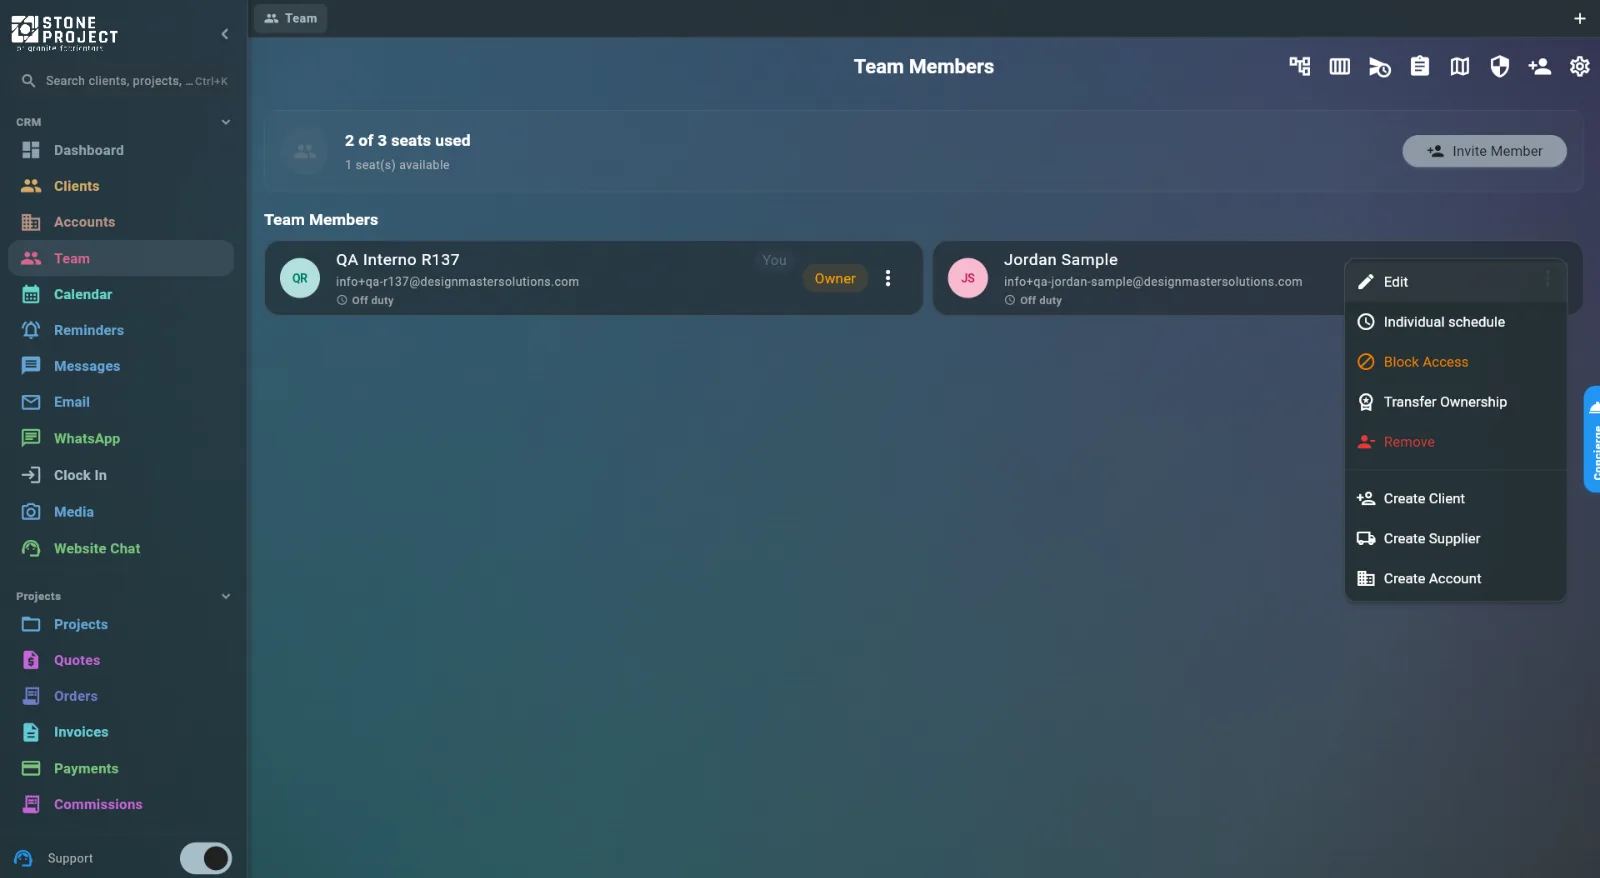
Open a member's row menu on the Team screen:
- Edit — change role, permissions, department and facilities
- Block Access — logs them out and blocks sign-in without deleting anything
- Remove — takes them off the company
- Resend Invitation / Cancel Invitation — for invites still pending (listed under Pending Invitations)
When Someone Leaves the Shop
Nothing is lost when a salesperson or installer leaves: their clients, jobs, quotes, invoices and history all stay in the company. What you need to do is hand their open work to someone who is still there, so no lead or appointment is left waiting on a person who is gone. Do it in this order:
-
Block first, remove later. On Team, open the person's ⋮ menu and choose Block Access, then confirm. They are logged out at once and cannot sign in again, but their name still shows in the filters below, which is what lets you find their work.
-
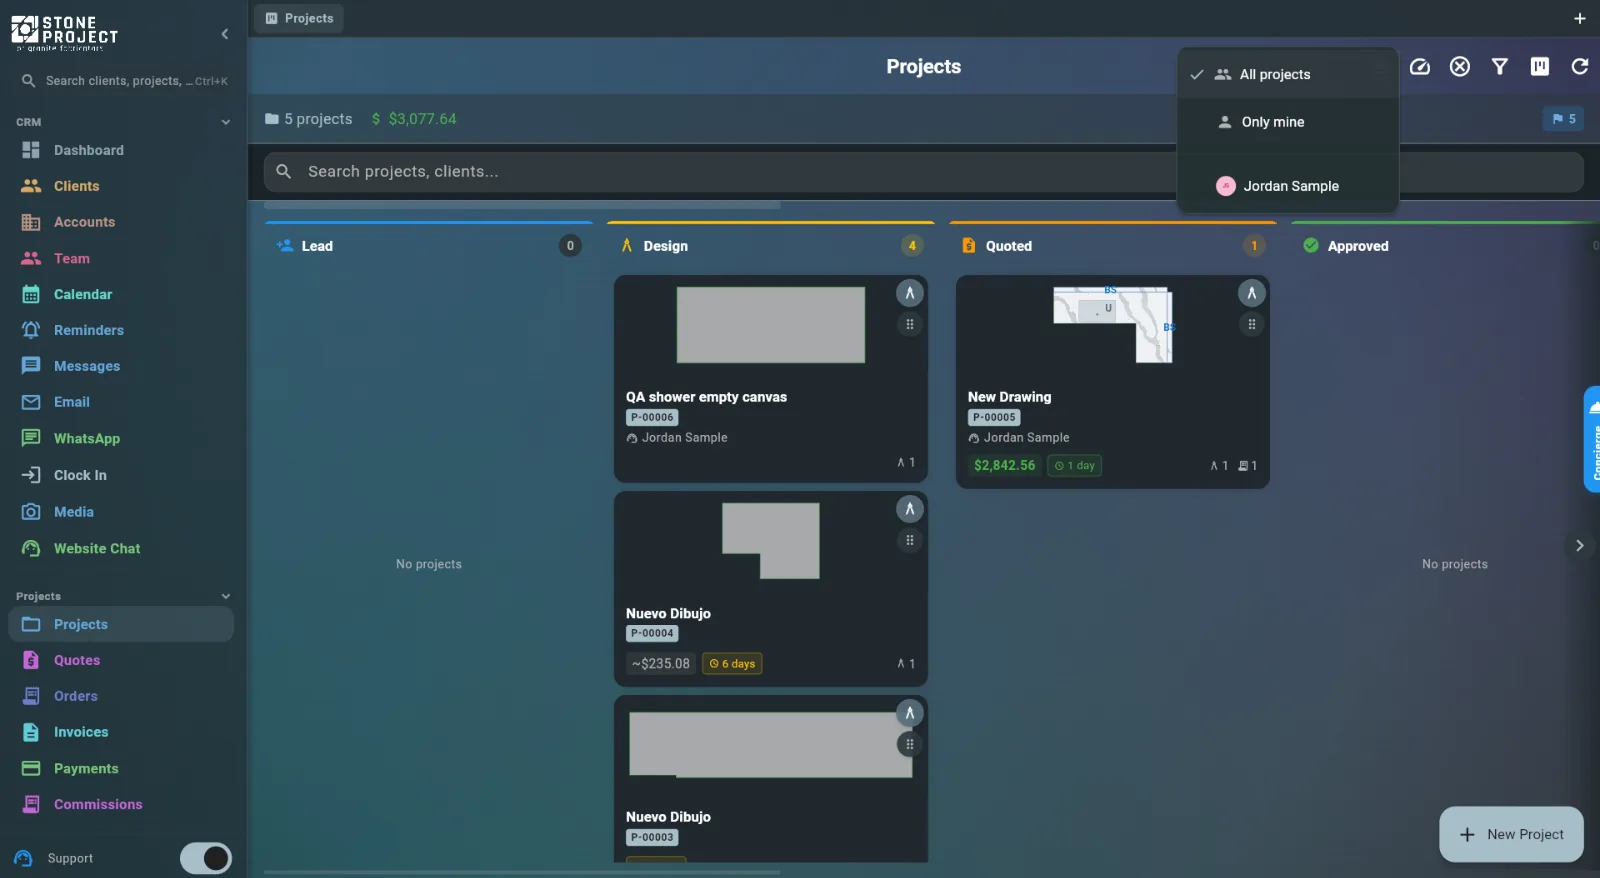
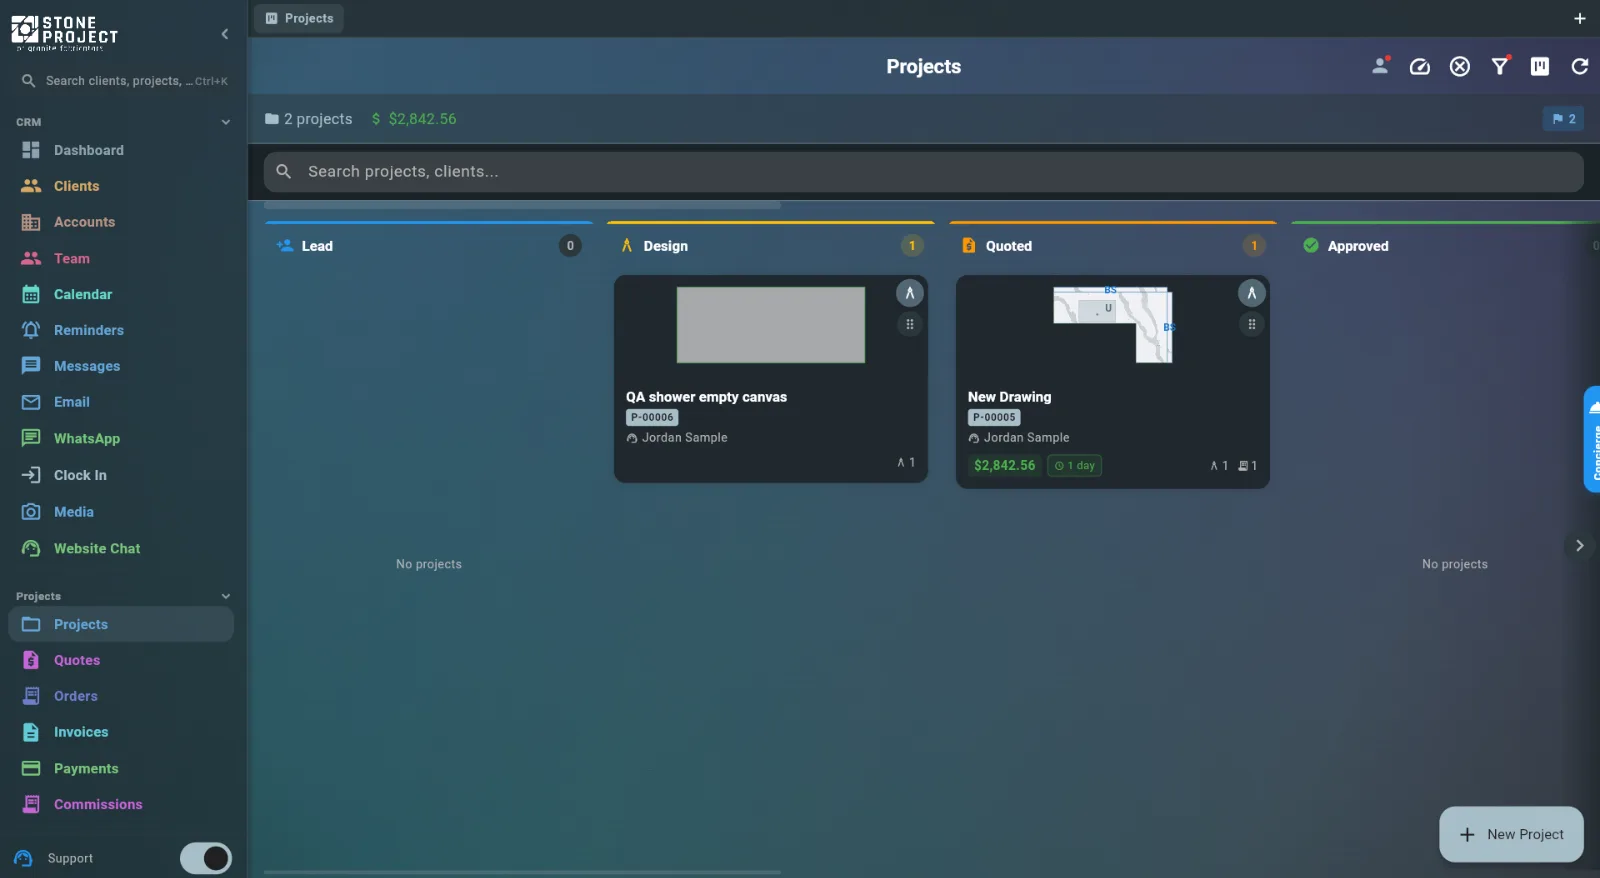
See every job that is theirs. Open Projects, tap the person icon at the top right and pick their name. The board now shows only the jobs where they are the salesperson or the person assigned, in every stage. The Lead column is the leads they were working on.
-
Give each job a new owner. Open the job, tap Edit and change Salesperson to the person who takes over (or to Unassigned if nobody does yet), then save. Commissions, reports and the "quote opened" notice follow the new salesperson from then on.
- Move their appointments. In Calendar, filter by their name and open each upcoming activity (template, install, follow-up call). Tap Edit Activity and change Responsible to the person who will go.
- Remove when the list is empty. When the board filtered by their name shows nothing you still need, go back to Team > ⋮ > Remove. This frees their seat on your plan. Their connected email inbox leaves with them, so if clients were writing to that personal address, ask them to use the shop's address instead.
If the person was the Owner of the company, use Transfer Ownership to hand the company to someone else before anything else; only the current owner can do that.
10.3 Team Map (Pro)
Pro Feature
The Team Map requires an active Pro subscription.
See where your team members are in real time on an interactive map — useful for dispatching, route planning, and coordinating field work.
Access: Go to Team (from the Team screen, tap the Map icon in the app bar or select Team Map from the menu).
How It Works
- While a team member has Stone Project open on the screen (phone, tablet or web) and has allowed location access, the app shares their position with the company: on every ~10 m of movement and every 30 seconds when standing still.
- When the app goes to the background, is closed or the person signs out, sharing stops. There is no background tracking.
- Everyone with a recent position appears on the map as an avatar marker.
Map Features
| Feature | Description |
|---|---|
| Live Location | See each member's current position, updated in real time |
| Offline Status | Members who are offline or have no recent location appear grayed out |
| Last Seen | Each marker shows how long ago the member's location was reported |
| Tap to View | Tap a marker to see the member's name, role, and last-seen time |
| Auto-Center | The map automatically fits all team members on screen |
Privacy
- Location is shared only while the app is open and in front on that device. Putting the app in the background or closing it stops sharing right away.
- The member must allow location access on the device; without it nothing is shared.
- The map shows the last known location of members who are not sharing right now, grayed out.
10.4 Facilities (Pro)
If your business has multiple locations (warehouse, showroom, fabrication shop):
- Go to Settings > Facilities.
- Tap Add Facility.
- Enter:
- Facility Name (e.g. Main Warehouse, North Branch)
- Facility Code (optional internal code, e.g. HQ, WH2)
- Address
- Active Facility (inactive facilities are hidden from lists) and Set as Main Facility (the default for new items)
- Tap Create. Team members, the floor plan and service areas are added after the facility is saved.
Pieces can be associated with specific facilities to help buyers know where the material is located.
GPS Coordinates & Map View
The facility's location comes from its address. It is used by the Route Planner (see Calendar > Route Planner and the Map) and as the Floor Plan satellite background. A facility showing Location not set needs its address fixed.
Service Area Management
Mark on the map the areas your company serves:
- Open a facility and tap Edit Areas in the Service Areas card.
- Tap Add Area and choose:
- Circle Area: a center point and a Radius (miles).
- Polygon Area: tap the map to draw the corners of a custom shape.
- Give it a Label (e.g. Downtown, North) and a Color, then Save.
Areas can be moved (Edit Position), reshaped (Edit Points) or deleted later.
Floor Plan Editor
Each facility can have an interactive floor plan to visualize rack layouts and piece locations. See Managing Pieces > Floor Plan Editor for details.
10.5 Business Hours
Set your operating hours once; the calendar, activity scheduling, the time clock and overtime all use them:
- Go to Settings > Company work hours.
- For each day of the week:
- Turn the day on (workday) or off (closed).
- Set Start and End.
- Optionally set Lunch start and Lunch end.
- Save.
The same hours appear on your public company profile. A team member with a different schedule gets Set own schedule on the Team screen.
10.6 Permissions (Pro)
There is no separate Permissions screen. Permissions belong to each team member and come from their role:
- One person: Team → member → Edit → Permissions section. Switch individual screens and actions on or off; Reset to role defaults undoes your changes.
- A reusable set: Team → Manage Roles to create a custom role (see 10.9 Custom Roles) and assign it to several people.
- A whole department: Apply Permissions to Department copies one member's permissions to everyone in that department.
Owners always have full access.
10.7 Referral Program
Every company can refer other fabricators and earn subscription credit. Nothing to sign up for.
Access: Settings > Referral Program.
The screen shows Your referral code with Copy link and Share, how many Visits your link got, your Available credit and the Credit history.
How It Works
- A shop that signs up with your code gets US$ 10 in credit when it subscribes.
- You earn 10% in credit on their payments for the first 12 months.
- Credit is applied automatically to your next Stone Project invoice. It is subscription credit, not a cash payout.
10.8 Company Files
Every file your company has — your logo, the photos on your listings, the documents attached to jobs — lives in one place.
Access: Go to Settings and tap the Storage usage card at the top of the Company section.
What's in There
| Section | Contents |
|---|---|
| Company assets | Your logo, images, and documents — the files you upload here directly |
| Project files | Everything attached to jobs, grouped by project |
The card at the top shows how much space you are using and how many files that is across how many projects.
Uploading
- Tap Upload.
- Choose what you are adding:
| Option | Accepted files | Used for |
|---|---|---|
| Upload logo | JPG, PNG, WebP | Your logo on quotes, PDFs, and your website |
| Upload image | JPG, PNG, WebP, GIF | Photos for your profile, listings, and website |
| Upload document | PDF, DOC, DOCX, XLS, XLSX, TXT | Certificates, price sheets, terms, anything else |
You can also drag files straight onto the screen — images and documents are filed automatically by their type.
Finding a File
Use the search box to match on file name, then narrow with the chips: All, Images, PDFs, Documents, and Today, This week, This month.
Opening and Removing
- Tap an image to open it full screen, where you can pinch or scroll to zoom.
- Tap any other file to open it in its usual application.
- Tap a project's header to jump to that project.
- Press and hold a company asset to delete it. You will be asked to confirm.
Running out of room
The storage card turns amber as you approach your quota and red once you pass it. If you manage your company's subscription, extra storage add-ons can be purchased from the same card.
Files on your desktop
The Stone Project Drive companion mounts these same files as a disk on your Mac or PC. See Stone Project Drive.
10.9 Custom Roles (Pro)
The built-in roles cover most shops. When they don't, build your own — a role is just a named set of switches.
Access: Go to Team and tap the shield icon in the header (or choose Manage roles from the ⋮ menu).
Reading the Screen
Roles are listed in two groups — Built-in roles and Custom roles — and the number chip on each card is how many permissions that role has switched on. It is the fastest way to compare two roles at a glance.
Creating a Role
The quickest start is to copy one that already works:
- Open the ⋮ menu on the role you want to base yours on and choose Duplicate. Give the copy a name (it is pre-filled with "(copy)") and confirm.
Or start fresh:
- Tap the + button.
- Fill in:
| Field | Description |
|---|---|
| Name | What the role is called |
| Description | A line explaining who it is for |
| Color | One of eight swatches, used on the role's badge |
| Copy permissions from | Start from scratch, copy any built-in or custom role, or copy an existing team member's exact access |
- Set the permissions (see below).
- Tap Save.
Copy a person, not a role
Copy permissions from also lists your team members. If one person already has exactly the access the new role needs, pick their name and the switches come over as they are.
Setting the Permissions
Permissions are grouped into cards by area. To work through a long list:
- Type in the search box to filter by permission or group name.
- Use the All / Enabled / Disabled buttons to see only what is on, or only what is off.
- Flip the switch in a group's header to turn that whole group on or off at once.
Two things the screen does for you:
- Dependencies. Switching on a permission that lets someone change something, without the matching permission to see it, prompts you to enable the missing ones. A note under the row flags it if you decline.
- Owner-only permissions show a padlock and cannot be granted to any other role.
Editing and Deleting
Use the ⋮ menu on a custom role card for Edit, Duplicate, or Delete. Built-in roles can be copied but not changed.
10.10 Delivery Settings
Tell the app how you get material to your clients, and it prices the delivery for you.
Access: Go to Settings > Delivery Settings. Requires the edit company permission.
How You Deliver
Three switches, and you can have any combination of them on:
| Option | Meaning |
|---|---|
| Accepts pickup | Buyers can collect from your shop |
| Offers local delivery | You deliver within your own area, in your truck |
| Offers carrier shipping | You ship through a freight carrier |
Local Delivery Pricing
The pricing fields appear once Offers local delivery is on:
| Field | What it sets |
|---|---|
| Delivery radius | How far out you will deliver, in kilometers |
| Minimum delivery order | The smallest order you will deliver |
| Delivery fee | The flat base charge on every delivery |
| Miles / Kilometers | Which unit the distance charge is quoted in |
| Cost per mile / km | Charged on top of the base fee, per unit of distance |
| Size surcharge per sqft | Charged per square foot of countertop — big jobs cost more to move |
| Weight surcharge per lb | Charged per pound of estimated weight |
| Default weight per sqft | How heavy a square foot of your material is, used to estimate the weight |
| Free delivery available | Turn on to waive delivery above a threshold |
| Free delivery minimum | The order total at which delivery becomes free |
The charge is built up like this:
base fee + (distance × cost per mile/km) + (square feet × size surcharge) + (square feet × default weight per sqft × weight surcharge)
If free delivery is on and the order total reaches the minimum, the whole charge drops to zero.
Delivery Policy Notes
A free-text field (up to 1,000 characters) for the conditions that don't fit in a number — lead times, curbside only, stairs, whatever your policy is.
Tap Save Delivery Settings when you are done.
Where This Shows Up
- On your profile and listings. The three delivery options travel with your company profile, so buyers browsing the marketplace can see how you hand material over.
- In marketplace search. Buyers can filter listings by Accepts pickup, Offers local delivery, and Offers carrier shipping — if a switch is off, your pieces are filtered out of that search.
- On quotes. When local delivery is on and you have priced it, a Delivery line is added to the quote automatically, calculated from the square footage in the drawing.
10.11 Linking a Shop Device
The Stone Project Drive desktop companion has to be authorized once against your account before it can see your files.
- Install and open the companion on the computer. It shows a pairing code in the form
ABCD-1234and opens the authorization page in your browser. - Check the account shown under Signed in as — the companion is linked to whichever account you are signed in as here.
- Confirm the code (it is usually filled in for you) and tap Authorize.
- A confirmation appears. The companion picks up the authorization on its own — nothing else to do on the desktop.
No password needed
This works for accounts that sign in with Google or another single sign-on and have no password of their own.
See Stone Project Drive for what the companion does once it is linked.