16. Help Articles
Focused walkthroughs for advanced features. Each article is self-contained and can be linked directly to clients or team members.
16.1 Setting up Commissions (Sales Team & Dealers) (Pro)
Track who sold what and how much they earn — for both internal sales reps and external dealers — directly from the quote.
Overview
Stone Project supports two commission models that can coexist on the same quote:
| Model | Who it applies to | Where it is calculated |
|---|---|---|
| Sales Team | Internal users (team members of your company) | Quote totals page |
| Dealer / Margin | External resellers (clients flagged as dealer) |
Quote totals page, deducted as a markup |
Setting up a Sales Rep
- Go to Settings → Team.
- Open the team member you want to mark as a sales rep.
- Enable "Eligible for commission".
- Set a default commission rate (percentage) — this can be overridden per quote.
- Save.
The user now appears in the Sales Rep dropdown on every quote.
Setting up a Dealer
- Go to CRM → Clients.
- Open or create the client and set Client Type = Dealer.
- Set a default margin (percentage) on the client — used to calculate the markup applied to your prices when this dealer resells to the end customer.
- Save.
Applying commissions on a quote
On the Quote Summary screen:
- In the Sales Rep field, select the team member who handled the sale. The default commission rate is pre-filled and the commission amount is calculated against the quote subtotal.
- If the client is a Dealer, the dealer margin is automatically applied and shown on a separate line ("Dealer markup").
- Both values flow into the PDF, the invoice, and your financial reports.
Reporting
- Analytics → Financial → Commissions shows a breakdown by sales rep and by dealer for any date range.
- Each row links back to the source quote so you can audit how the commission was calculated.
Best practice
Set default commission rates at the team member level so you don't have to remember the number every time you create a quote. Override only when a special arrangement applies.
16.2 Adding Material Brands & Colors (Pro)
Build a structured catalog of the materials you actually sell, with brand-level and color-level pricing.
Concept
The pricing catalog is organized in three layers:
Material Type  →  Brand (Manufacturer)  →  Color
   (Granite)         (Caesarstone)        (Pure White)
- A Material Type is the broad family (Granite, Quartz, Marble, Quartzite, Porcelain, …).
- A Brand is the manufacturer that produces a specific line of that material type (Caesarstone, Silestone, Cambria, …).
- A Color is the actual SKU sold — with its own price per square foot or per slab.
You can sell colors directly under a Material Type (no brand), or organize them under a Brand. Both styles work in the quote selector.
Adding a new Material Type
- Go to Financial → Price Lists (on a phone: More → Financial → Price Lists), open your price list and pick the Material Types tab.
- Tap + New Type.
- Enter a name (e.g., "Sintered Stone") and pick an icon.
- Save. The new type is now available in all quote selectors.
Adding a Brand
- In that same Material Types tab, open the type you want to add a brand to.
- Tap + New Brand.
- Enter the brand name (e.g., "Caesarstone") and optionally upload the brand logo.
- Save.
Adding a Color
- Open the Material Type or Brand where the color belongs.
- Tap + New Color.
- Fill in:
- Name (e.g., "Pure White")
- Price per sqft or Per-slab price (toggle "Sold by the slab")
- Color swatch image (optional but recommended — it appears in the quote selector)
- Save.
Adding a Photo or Color to a Color (the swatch)
The small square left of each color name in the Colors list is the swatch. It is the picture your clients see in the quote, and the texture the drawing uses on the countertop. A color with no picture shows a grey square.
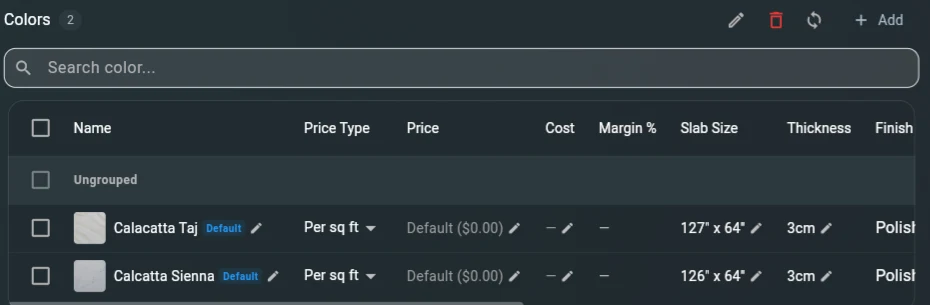
- Open Settings → Price Lists, open your price list and tap the Materials tab.
- Pick the material type, then the brand, until the Colors list appears.
- Tap the square left of the color name. The Color / Texture window opens.
- Tap Upload Image (it reads Change Image when the color already has one) and pick the photo. Crop it if the app asks.
- No photo? Pick one of the colors under or select a color instead.
- Tap Save.
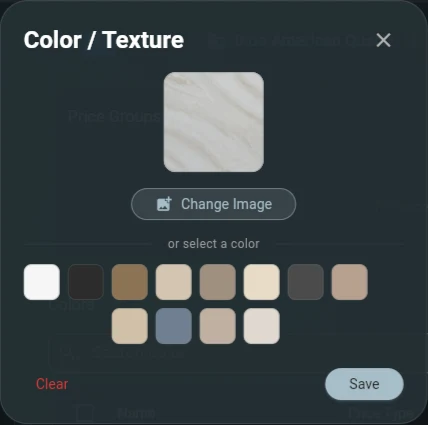
- Clear removes the picture or color. The X at the top closes the window without changing anything.
- Use JPG, PNG or WebP, up to 10 MB. If the app refuses a file, open it in Photos or Preview and export it as JPG.
- Crop to the slab surface only (no table, no edge of the photo). A tight crop is what makes the countertop in the drawing look like the real stone.
Why the quote shows a grey square
The swatch is empty. Add the picture here and the quote, the drawing and the slab layout all pick it up.
Cascade selector in quotes
When designing a quote, the material selector follows the catalog hierarchy:
- Pick a Material Type → the Brand dropdown opens automatically.
- Pick a Brand (or skip if not used) → the Color dropdown opens automatically.
- Pick a Color → pricing is filled in.
This auto-open cascade also works inside additional Color Options (see 16.3).
Bulk import
For large catalogs:
- Go to Settings → CSV Import → Pricing.
- Download the template.
- Fill in
material_type,brand,color,price,price_unitcolumns. - Upload — the import creates missing types/brands automatically.
Avoid duplicates
The importer matches by name (case-insensitive). Use consistent spelling for brand names across rows.
Fixing many colors at once
A whole brand imported with the wrong slab size — or a price change that hits every color in a group — does not have to be typed color by color.
- Go to More > Financial > Price Lists and open the list.
- Open the Materials tab and the brand you want.
- Tick the colors to change (or the header checkbox to take the lot).
- Pick the bulk action from the bar that appears:
| Action | What it changes |
|---|---|
| Set slab size | Length and width, in inches, on every selected color. Leave one field blank to keep the current value |
| Set cost | Cost per sqft and cost per slab on the selection. A blank field is left unchanged |
| Assign price tier | Moves the selection into a pricing tier |
| Activate / Deactivate | Whether the colors can be picked on a quote |
| Delete selected | Removes the selected colors |
A brand that only ever ships one slab size — Vicostone at 130 × 65, say — is a one-minute job this way: select the brand's colors, Set slab size, 130 and 65, save.
16.3 Using Color Options for Quote Comparisons (Pro)
Offer your client two or three material choices in the same quote and let them compare prices side-by-side.
When to use it
- The client is undecided between a premium quartz and a budget granite.
- You want to upsell from a base color to a designer color.
- A designer/architect wants to evaluate the cost impact of different stones on the same layout.
Adding a Color Option to an area
In the Drawing Tool, on the area sidebar (right panel):
- Open the Material step and pick the primary material and color for the area first. The button only appears once the area has a color.
- Scroll to the bottom of the Material panel, past the price and the inventory slabs, and tap + Add Material Option (older versions of this guide called it "Add Color Option"; it is the same button, available on every plan that has the Drawing Tool and for every user who can edit the drawing).
- A new option card appears. Pick Material Type → Brand → Color in it (each step auto-opens the next).
- Optionally give the option a label ("2nd Option", "Designer Choice", "Budget"). If left blank, the app uses an ordinal label.
- Tap + Add Material Option again for a third choice. There is no fixed limit; two or three alternatives per area keep the comparison readable.
You can add Color Options on multiple areas — each area keeps its own list.
Switching between options
- The active option for each area is the one that drives the quote totals.
- Tap any option card to make it active. The summary totals refresh instantly.
- The original primary material is always preserved — you can return to it at any time.
Comparison Grid (Quote Summary)
When any area has 2+ options, the Quote Summary screen shows a collapsible "Compare Material Options" card. It contains a grid where:
- Each column is one option (Primary, 2nd Option, …).
- Each row is one area.
- Cells show the material cost for that area under that option, plus the delta (Δ) vs. the active selection — colored red if more expensive, green if cheaper.
- The footer row shows the total cost for each option across all areas.
The grid fills the available width and scrolls horizontally on small screens.
Version tabs: which stone the client is buying
When an area has Color Options, the price screen of the drawing (and the drawing card on the project page) shows one tab per option: Version 1 · Calacatta, Version 2 · Taj Mahal, and so on, each with its total. Version 1 is always the primary stone.
Tapping a tab only changes what you see. The quote keeps charging the version that is active on the drawing until you say otherwise.
The client chose another version — how do I bill it?
- Open the project and, on the drawing card, tap the tab of the version the client picked (for example Version 2).
- Tap Use version 2 on the quote right below the tabs and confirm.
- That stone becomes the active one on the drawing and the quote is recalculated from it, including an already accepted quote. Refresh the page if the total does not change at once.
Do the same thing every time the client changes their mind: open the version, tap Use version N on the quote.
Which version was approved? Once the client accepts the quote, the accepted version is marked in green with a check and the word Approved next to its total, both on the price screen and on the project card. Before that, no tab is green.
Items that belong to one version only
Extra items on an area (a reduction, an extra discount, a removal, a sink cut-out) can apply to every version or to just one:
- New items stay in the version on screen. An item you add while Version 2 is open is created only in Version 2; the other versions are not touched.
- To take an item out of one version, open that version, tap the item and choose Leave out of this version. The line shows not in this version and that version's total drops at once.
- To put it back, or to make an item that should count everywhere (like a removal) part of another version, open the other version, tap the item and choose Add back to this version.
The same choice follows the item to the quote, the PDF versions and the project card.
Changing a stone price inside a version. Applying a new price to the other areas with the same stone only changes the areas of the version on screen. The other versions keep their own price.
Fabrication and installation prices are per version too. Change the fabrication or installation unit price while Version 2 is open and only Version 2 changes; Versions 1 and 3 keep their own (for example 40 on Version 1, 65 on Version 2, 40 still on Version 3). Each version's total adds its own labor difference, and when you tap Use version N on the quote the quote switches to that version's labor price along with its stone.
A slab layout for each version
Each version can be laid out on its own slabs, sized to that stone. On the slab layout screen, next to Layout, tap the stone name with the small arrow and pick the version. The first time you switch there, the app turns on a separate layout per color, so every version keeps its own slabs instead of redoing the layout on every switch.
Comparison in the PDF
When you generate a Quote PDF, an additional "Material Options Comparison" table is rendered between the line items and the totals. It shows:
| Column | Meaning |
|---|---|
| Option | Name of the alternative (or "Current Selection" for the active) |
| Subtotal | Quote subtotal under that option |
| Tax | Tax amount under that option |
| Total | Final total under that option |
| Δ vs Default | Difference vs. the active total (red = more, green = less, — = 0) |
To keep the PDF readable, the table renders the active selection + up to 3 alternatives. If you have more, a small footnote indicates the count of options not shown — consider trimming the list before sending.
The comparison section is hidden when Show Price Details is disabled on the quote.
One PDF per option (separate proposals)
A comparison table answers "how much would the other stone cost" inside one file. When you'd rather send one proposal per material — three stones, three attachments, each showing a single price — export them from the Drawing Tool: Export Estimate PDF > Material Option.
- All options (comparison) — the default, and what the app has always done: the drawing's own active material, plus the comparison box.
- Primary (…), 2nd Option (…), 3rd Option (…) — prices the whole document with that stone. Line items, totals and the drawing's colors all change together, and the comparison box is dropped, so the client sees one material and one price. An area that has no alternative keeps its own material.
On desktop, the button next to Print reads N PDFs (1 per option) and renders every option in one go. Each file is named after its stone (estimate_kitchen_2nd-Option-Taj-Mahal.pdf), so the three land in your downloads folder ready to attach. Your browser asks once whether to allow multiple downloads.
Still want the two-column comparison?
Leave the picker on All options and export normally. The two are not exclusive — a single comparison PDF for the first conversation, three separate proposals when the client wants to show them to someone else.
Sharing with the client
Three places the client will see the comparison:
- Quote Summary screen (in the Stone Project app, if you screen-share or invite them).
- PDF attached to the quote email (table format described above).
- Client Portal — when the quote is opened in the portal, each option appears as a selectable radio button. The client can pick their preferred option and the quote total updates accordingly.
Naming options well
Use descriptive labels like "Premium — Calacatta" or "Budget — Black Galaxy" instead of "Option 2". Clients are far more likely to engage with a comparison when each line tells them what they are looking at.
16.4 Quote Validity — Why It Shows 30 Days and How to Change It
The Quote Validity field on the Quote Summary screen controls how many days the client has to accept the quote before it expires. It appears in the PDF and in the Client Portal.
Where to configure the default
- Go to Settings → Drawing & Documents → Quote Validity.
- Set the default number of days (default is 30).
- Save. New quotes created after this change will use the new default.
Per-quote override
When you create or edit a quote, the Quote Validity field in the options bar (above the price details) lets you change the validity for that specific quote only. Changing it here does not affect the company default.
Why existing quotes still show 30 days
The default in Settings is applied when a quote is created. It does not rewrite quotes that already exist. If you had quotes created before changing the default, they keep their original validity (usually 30 days). To fix a specific quote, open it, change the Quote Validity field in the options bar, and regenerate the PDF.
What happens when a quote expires
- The status changes to Expired.
- The client can no longer accept it from the Client Portal.
- You can resend it (which creates a new revision with a fresh validity period) or create a new quote from the drawing.
16.5 Edit Quote from Drawing — Updating an Existing Quote
You can reopen the Drawing Tool from an existing quote, make changes, and generate an updated PDF without starting from scratch.
When to use it
- The client wants a different edge profile, material, or sink position.
- You need to adjust dimensions after a site visit.
- A cutout was placed incorrectly.
Steps
- Open the quote (Quotes → tap the quote).
- In the top toolbar, tap Edit Drawing (on phones, swipe the bar right if the button is off-screen). The Drawing Tool opens with the current drawing loaded.
- Make your changes (shape, material, cutouts, seams, etc.).
- Return to Step 6: Quote Summary. The price breakdown updates automatically.
- Tap Export Quote to generate a new PDF with the changes.
- The original quote remains in Sent status until you resend it. Tap Resend Quote to send the updated version to the client (creates a new revision).
Version history is preserved
Each time you resend, a new revision is created. The client sees the latest revision in the portal; you can view previous revisions in the quote's History tab.
Orders are not updated automatically
If the quote was already converted to an order, editing the drawing does not change the order. The order keeps the locked scope and price from when it was created. To update the order, either create a new order from the revised quote or edit the order directly (see 18.2 Creating an Order from a Quote).
16.6 Seam Cutting Through Sinks — Controlling Seam Placement
By default, the auto-seam logic avoids placing seams through sink cutouts. You can override this when the fabrication requires a transverse cut across the sink.
How auto-seam works
When you run Magic Auto-Layout (Slabs column → Magic Auto-Layout), the algorithm: 1. Places pieces on slabs to minimize waste. 2. Adds seams only where a piece is longer than the slab. 3. Skips any seam that would cross a sink or cooktop cutout — it shifts the seam to the nearest clear span instead.
Forcing a seam through a sink
If your shop needs the seam to cut through the sink (e.g., for vein matching or slab constraints):
- In Step 5: Material & Color, right-click (or long-press) the countertop shape.
- Choose Define Seams.
- In the dialog, tap Add Seam and position the line where you want it — even across a cutout.
- Save. The seam cost is calculated and included in the quote.
The manual seam you define always wins over the auto-seam logic. Magic Auto-Layout will respect your manual seam and will not add another one in the same area.
What Magic Auto-Layout does with sinks
- If a piece with a sink does not fit on one slab, Magic Auto-Layout adds a seam automatically but places it clear of the sink (before or after the cutout, whichever wastes less material).
- The preview shows both parts on the slab so you can see where the cut lands before accepting.
- To fine-tune, open Define Seams and adjust the seam position manually — the section sizes update live.
16.7 Taxable Lines — Choosing Which Lines Pay Sales Tax
On the price details (Step 6: Quote Summary), every priced line has a small % icon next to its total. It decides whether that line pays sales tax.
| The % icon is... | The line is... |
|---|---|
| Orange | Taxable: the tax rate of the drawing is applied to it |
| Gray | Not taxable: it adds to the total without tax |
Tap the icon to switch one line. Hover or long-press it to read Taxable item or the opposite.
Where the starting choice comes from
A new line starts from the company rule in Settings > Invoice Settings (see 12.9 Invoice Settings):
- Charge sales tax on materials (on by default): stone, backsplash and products start orange.
- Charge tax on labor and services (off by default, the US rule): fabrication, installation, edges and cutouts start gray. Turn it on where everything is taxable.
A line you switched by hand keeps your choice, even after you change the rule.
I marked lines as taxable and no tax shows up
The % icon only says which lines are taxed. The rate comes from the Tax control in the options bar above the price details. On -None- the quote has no tax at all. Pick one of your rates (from Settings > Tax Rates) or Custom tax rate to type a percentage for this drawing alone.
Quotes with more than one material version
The taxable choice belongs to the area, not to the version tab. Marking a line on Version 2 marks the same line on Version 1, so both options are priced with the same tax rule and the client compares like with like.
Need a topic we don't cover yet? Email [email protected] and we'll add it.